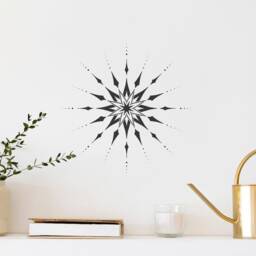
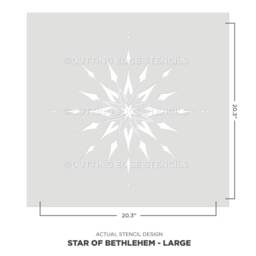
Here's the brightest of all stars, the Star of Bethlehem! This beautiful celestial stencil design is dedicated to the Biblical star that inspired the three wise men on their journey. This star stencil will shine brightly on your walls, either stenciled as a single motif or styled as an allover wallpaper pattern. We used 2 sizes to create a beautiful celestial wall pattern. This celestial stencil design can be painted with a foam roller and/or stencil brushes. If you'd like to create a shimmering effect for your stencil & give it a beautiful glow, use metallic paint. You can even use a glow-in-the-dark paint to stencil the stars! Single overlay stencil SMALL design size: 10.5x10.5 LARGE design size: 20.3x20.3 This celestial stencil is so easy to use, virtually anyone can do it. Simply tape the stencil to the wall using BLUE painter's tape, then load your foam roller with the paint of your choice (latex or acrylic). Get rid of excess paint by rolling the foam roller over a folded paper towel. Then, just roll it over the stencil applying medium pressure for an instant fabulous result! Don't press on the roller too hard otherwise you might get some bleed. Transform your room in less than 1 hour! You can stencil with acrylic or latex paint, stencil creams, fabric paint or glaze. Use a foam roller or stencil brush. Although our stencils do not require the use of spray adhesive, this pattern could benefit from it to help minimize paint seepage, especially if your walls have a slight texture to them. (Elmer's spray adhesive seems to be the best). Make sure you shake the can well & lightly mist (not drench) the stencil, & let it dry for a moment before positioning it on the wall. This step will prevent the adhesive residue transferring to the wall. You'll need to re-mist the stencil after a few repeats. Note: you will still need to hold the stencil in place with a few pieces of blue painters tape! Adhesive by itself is not enough to hold the stencil on the wall. Clean-up tip: Spray the stencil with Simple Green to help to remove adhesive residue. Please note that once you've used spray adhesive on your stencil, it will never really come off completely. That is why we personally prefer not to use adhesive, & instead use less paint on your roller or stencil brush. IMPORTANT INFO ON STENCILING TExTURED WALLS: in general, it's possible to stencil over textured surfaces, however it depends on the roughness of your texture & your desired outcome. Some textures are really rough, with huge peaks & valleys and, if this is your case, stenciling may not be an option. However, there are light to medium textures that are very suitable for stenciling. With textures it is especially important that you put very little paint on your brush & always off-load it onto a paper towel. Use a rubbing/dabbing motion while stenciling & try not to force the paint under the edges of the stencil. You can also use a dense foam roller, but make sure that you off-load it onto some paper towels so that it is relatively dry. To avoid seepage, use very little paint, & don't press hard on the roller. Using spray adhesive can also help prevent seepage of paint under the stencils. We love Elmer's re-positionable spray adhesive but most re-positionable spray adhesives are fine. Always test the stencil on a disposable surface first (such as a piece of cardboard), or try stenciling a small area in a corner somewhere & immediately wipe the stenciled paint off the wall with a moist baby wipe. Also, it's good to remember that using high-contrast colors (like black over white) is much less forgiving than using colors that are similar to each other. SPRAY ADHESIVE: We find that it is not necessary to use spray adhesive with our stencils. However, if you want crisper edges or are stenciling with high contrasting colors, please use it (Elmer's spray adhesive seems to be the best). It is helpful for beginners to mist a stencil with spray adhesive just to make sure you get great results. Always use pieces of blue painters tape to secure your stencil in place. STENCILING FABRIC: You can create custom stenciled curtains, pillows & tablecloths with our stencils! When stenciling on fabric, stencil adhesive is very helpful. First, tape your ironed fabric to the surface so it doesn't move around while you stencil. Use stencil brushes, or roller, & add some textile medium (sold in craft stores) to your acrylic paint. You can also get a special fabric paint, but, frankly, good